To start creating a new sales invoice, select Sales Invoicing from the navigation menu.
Quick guide to creating a sales invoice
You can create a new sales invoice from scratch or copy an existing sales invoice.
Create a new invoice
- Click the New invoice button on the Invoices page or in the customer register, select New invoice from the three-dot menu on a customer card.

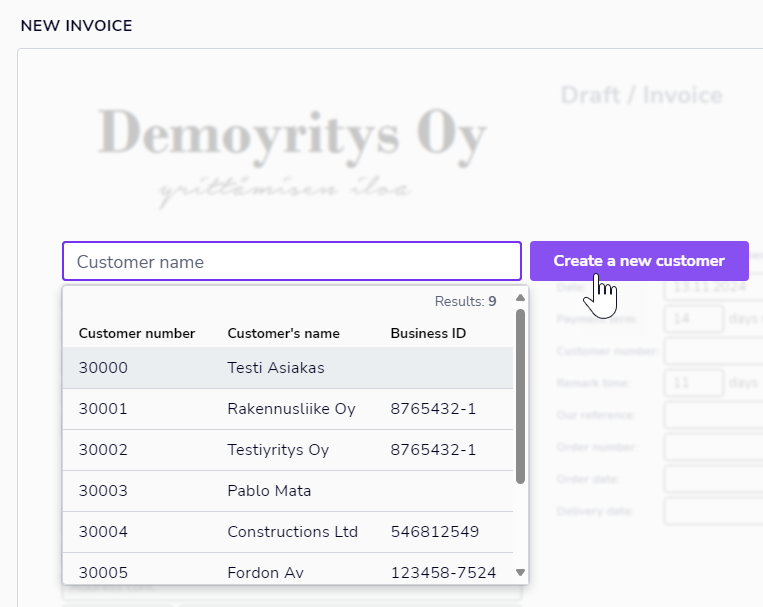
- Select a customer from the list. Customer information is imported from the customer card. To add a new customer, select Create a new customer.
- To edit the details of the sales invoice, click at the top of the invoice. Mandatory information is indicated by a red triangle.
- Add an invoice row with the Add new row button and select a product from the product register or enter a product name. In addition to invoice rows, you can add subheadings with the Add heading button.
- Enter invoice row information. Mandatory information is marked with a red underlining. Save the invoice row with the Close row button.
- The delivery method of the sales invoice is shown on the Send invoice button. Select a delivery method by clicking the arrow on the Send invoice button.

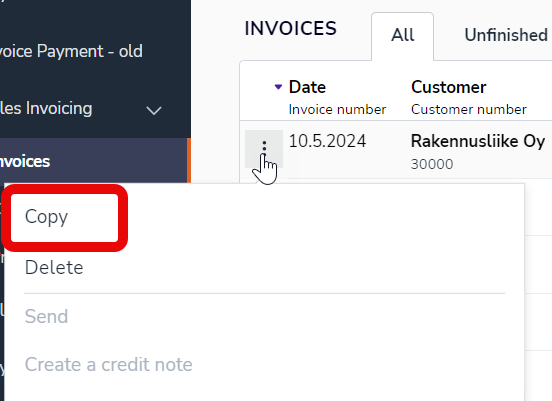
Copy an existing invoice
- On the row of the sales invoice that you want to copy, select Copy from the three-dot menu.
- Select the customer and click the top of the invoice to edit the details on the sales invoice.
- Edit invoice rows and their details.
- The delivery method of the sales invoice is shown on the Send invoice button. Select a delivery method by clicking the arrow on the Send invoice button.
Create a new sales invoice
Select the customer
- Click the New invoice button on the Invoices page.
- Select the customer you want to invoice by entering the customer’s name, name extension, or account number, and select the customer from the list.
- To add a new customer:
- Select Create a new customer.
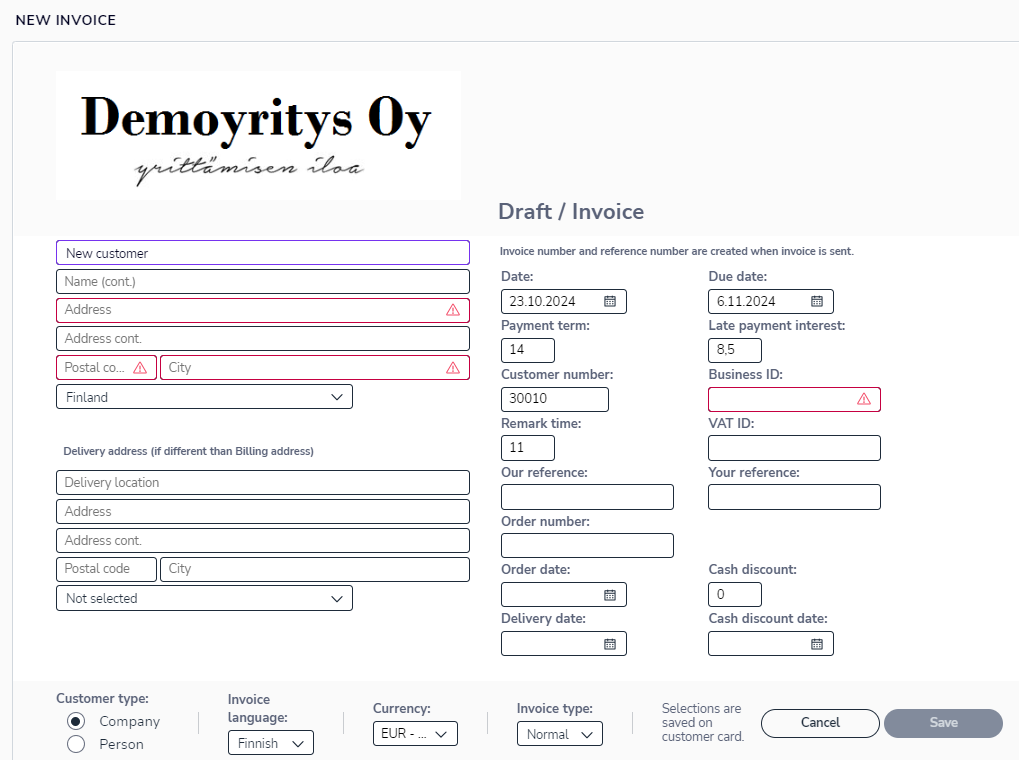
- Enter the customer’s address and business ID (for corporate customers).
- Select the type of customer: company or person.
- Select the customer invoice language, currency, and invoice type.
- Select Save to create a new customer in the customer register.
- Select Create a new customer.
Edit sales invoice information
When you create a new sales invoice, the application automatically fills in the basic information such as the invoice date, due date, payment terms, late payment interest, and the notice period. If the invoice date is in a closed period (the sales invoicing cut-off date has passed), a red triangle appears before the invoice date, and the invoice cannot be sent until the date is changed.
The company logo will appear on the invoice draft if you have selected a logo in the sales invoicing settings.
Click at the top of the invoice to edit the basic information. For example, you can add a reference (your own and customer’s), order number, delivery date, and checkout sale date to the sales invoice.
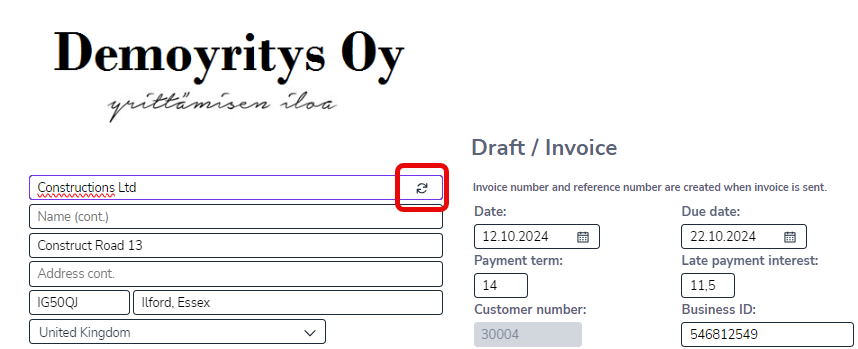
You can also change the customer on the invoice or add a completely new customer. Only the customer-specific information on the invoice will be changed. Other information, such as product rows, will remain the same.
Select Save to save the draft sales invoice. The invoice number and reference number are automatically generated when the invoice is approved for delivery.
Add product rows and headings
- Select Add new row.

- Select a product from the product register.

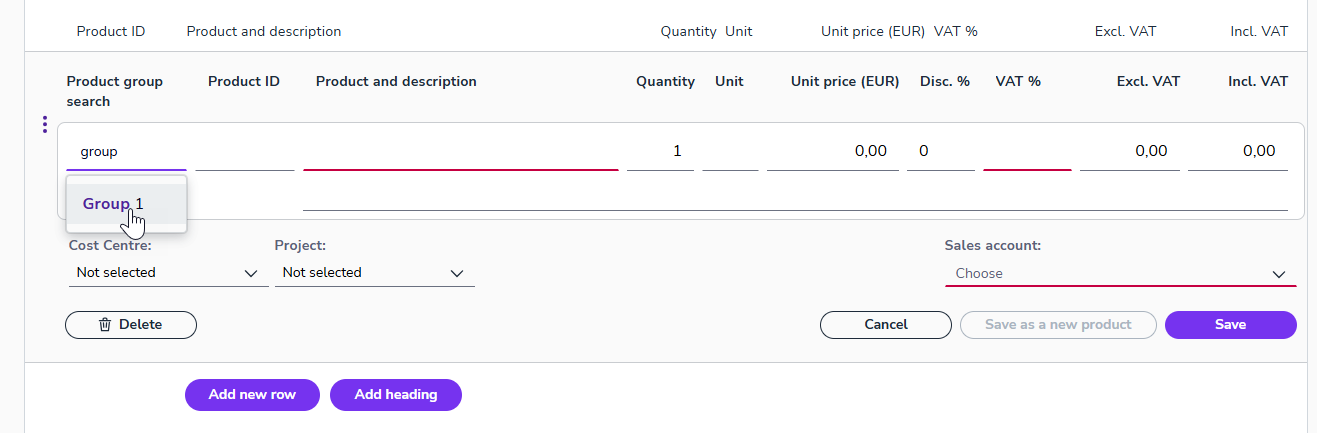
- If there are a lot of products, use the product group search. In the Product Group Search column, select a product group to display only the products in the selected product group in the Product and Description column. If you add more than one product line to the same invoice, the program will remember the selected product group. Read more about creating product groups.
- You can also add a new product that is not found in the product register.
- Enter the product details. Mandatory information is indicated in red.
- Enter the unit price (price excluding tax).
- If the total amount including tax is known, select VAT, enter the price including tax in the Incl. VAT field, and the application calculates the unit price.
- Add optional dimensions.
- To save the product to the product register, click Save as a new product.
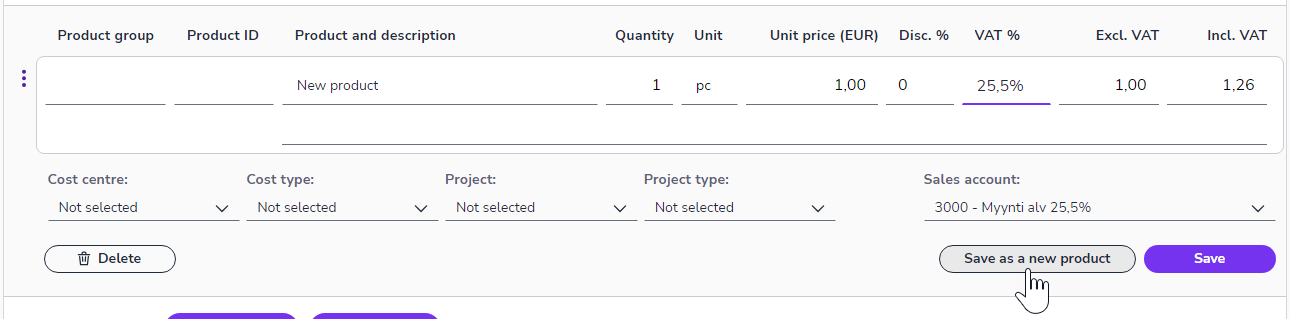
- Select Save to save the product row, or press Enter to add a new invoice line.
- Click the Delete icon in the bottom left corner to remove a row.
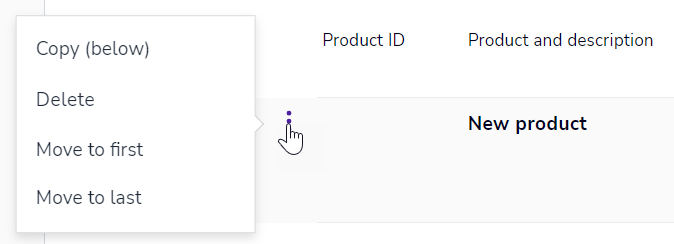
- Use the three-dot menu on the left side of the invoice row to copy and delete the row and move it to the top or bottom. You can also drag the row with the mouse to the desired location.
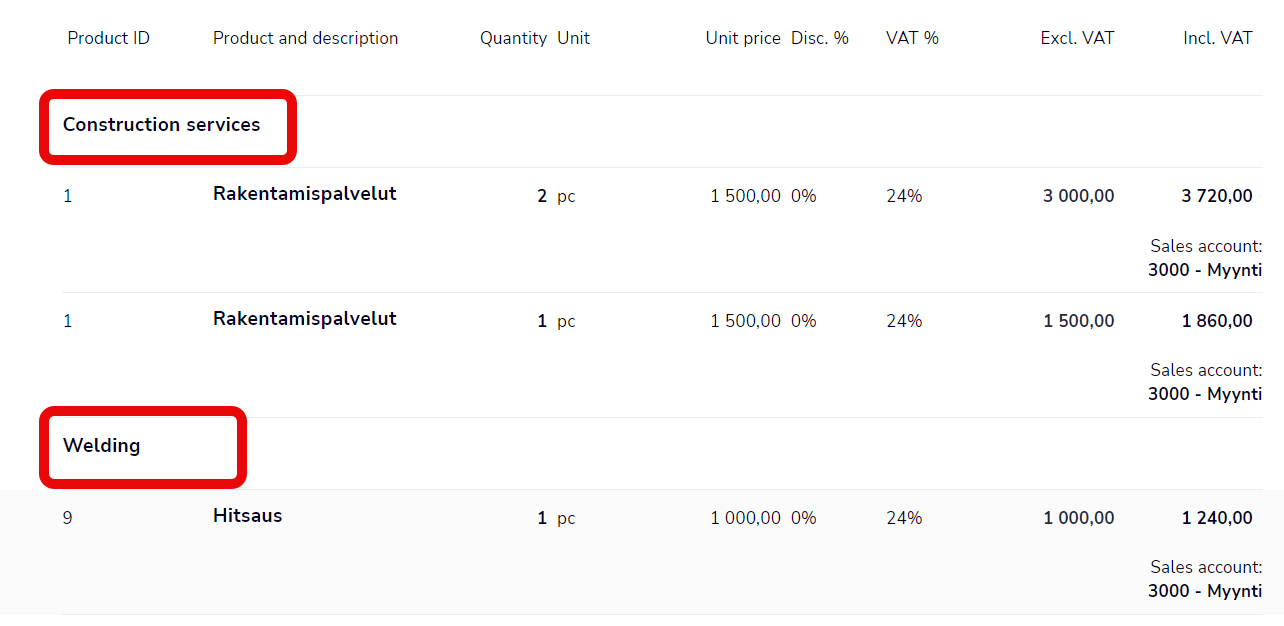
- In addition to product rows, you can add subheadings in the invoice. Click Add heading and type the heading text. You can drag the heading where you want.
- Select Hidden information to see the selected sales account and dimensions for each invoice row without opening the rows.

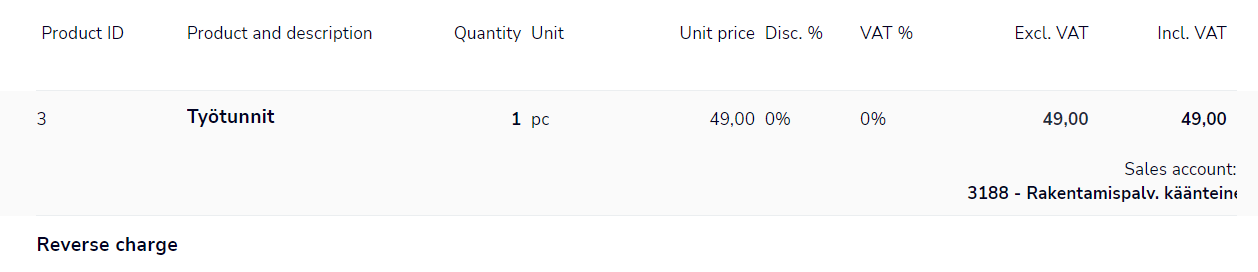
- If you are making tax-free sales, select the correct sales account for the product.
- For example, if you use the reverse tax liability of a construction service, select a sales account intended for this purpose, and the application will automatically generate an info text on the invoice.
- For example, if you use the reverse tax liability of a construction service, select a sales account intended for this purpose, and the application will automatically generate an info text on the invoice.
Add an invoice-specific message
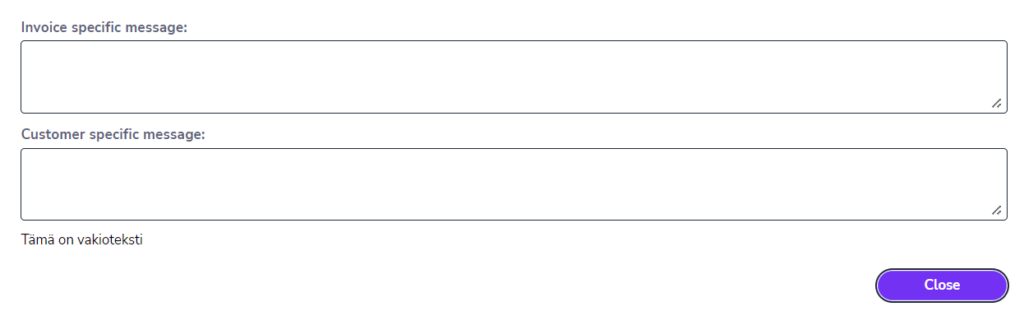
- To add a message to a sales invoice, select Add message at the bottom of the sales invoice.
- In the Invoice-specific message field, you can enter a free-form message.
- The Customer-specific message field is automatically copied from the customer card. You can edit or delete the message for each invoice.
- Select Close to save the messages to the sales invoice.
Add attachment
- Select Add an attachment at the top of the view.
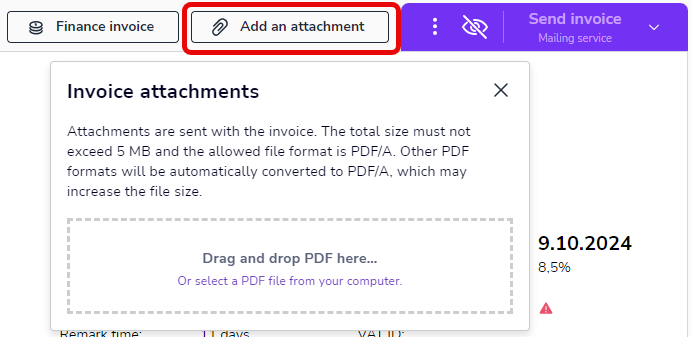
- The attachments must be in PDF/A format and the maximum allowed size in total of all attachments is 5 MB. Note that files in other PDF-formats will be converted to PDF/A, which may increase the file size.
- Press the button again to open or delete the attachments.
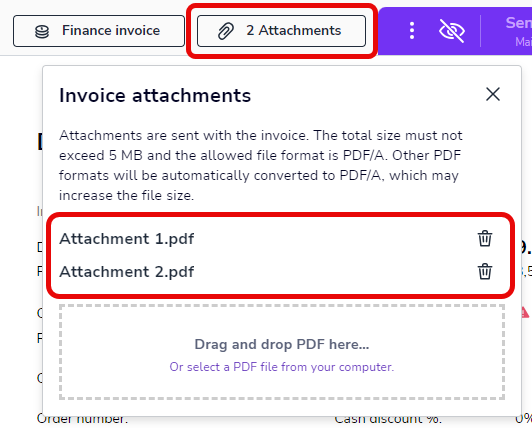
- Attachments cannot be deleted or edited after the invoice has been sent.
Send a sales invoice
- When the invoice is ready, select Send invoice to send the sales invoice to the customer. The button will indicate the selected delivery method.
- To change the delivery method, click the arrow on the Send invoice button.
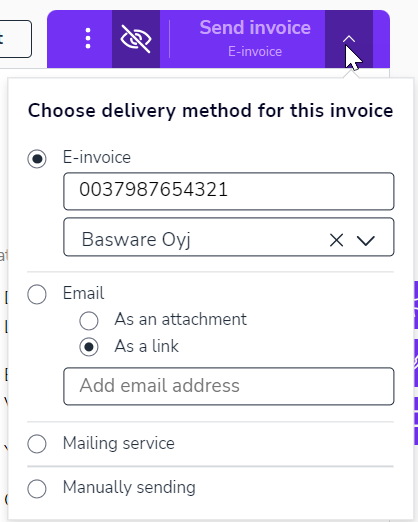
- E-invoice: Enter the e-invoice address and select the operator ID. You can search for e-invoice addresses by customer’s name or business ID from the TIEKE e-invoicing address book.
- Email: Enter an email and choose whether the invoice is sent as an attachment or as a link in the email. The sender of the message is invoicing@talenominvoices.fi.
- Mailing service: The sales invoice is sent to the customer as a letter.
- Manual sending: The sales invoice is not sent from the system to the customer. Print or download the sales invoice as a PDF file and deliver it to the customer.
- Finally, select Send invoice.
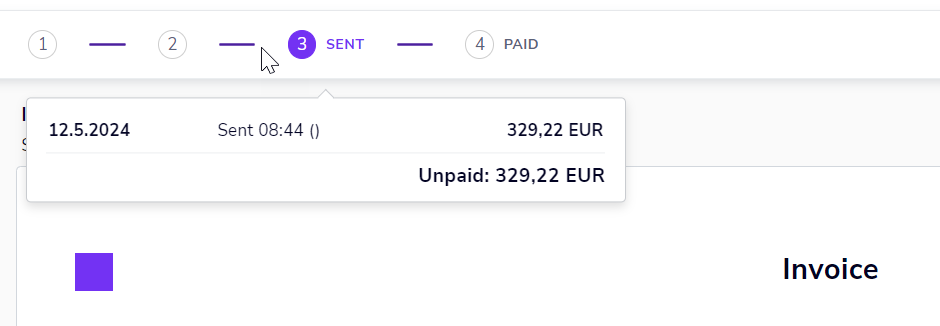
- Invoices sent through e-mail and mailing service can be found in the Invoices view with status Scheduled shipment and you can still edit the sales invoice. The status will change to Sent after 8 p.m. on the current day.
- A sales invoice sent as an email is delievered to the customer immediately and status changes to Sent.
- To see the sales invoice transaction details, hover your mouse at the top of the opened sales invoice.
- To save a sales invoice as a draft, just exit the invoice creation mode. You can find the draft sales invoice in the invoice list. Click on the invoice to continue editing.
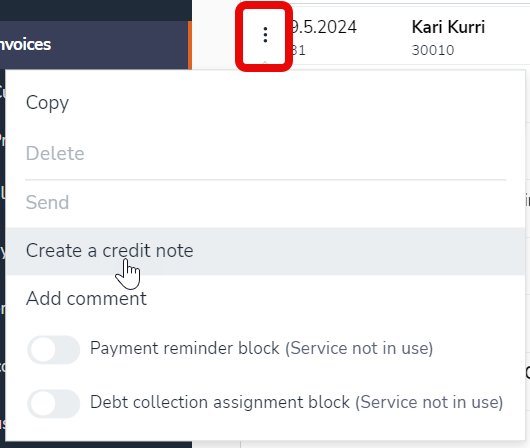
Invoice-specific actions
Click the three-dot icon in the Send invoice button to access some invoice-specific actions.
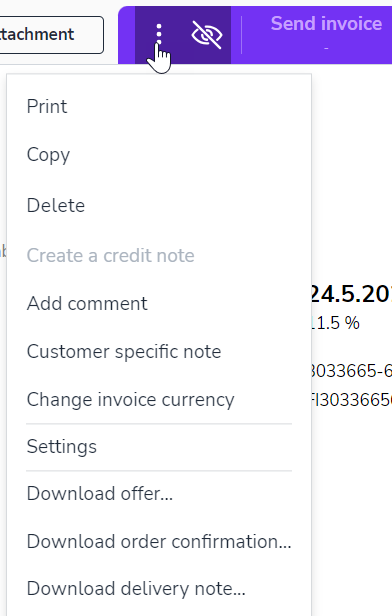
- Print: Download the sales invoice as a PDF file.
- Copy: Create a copy of the sales invoice.
- Delete: Delete the sales invoice.
- Create a credit note: Create a credit note for a sent sales invoice.
- Add comment: Add a comment to the sales invoice (for internal use, not printed on the invoice). You will see the comment at the top of the sales invoice, next to the Sum information.
- Customer-specific note: The note is updated on the customer card. Not printed on the sales invoice.
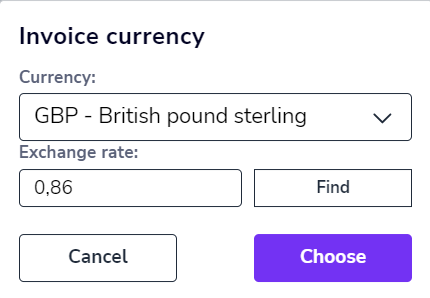
- Change invoice currency: Select the currency used in the sales invoice. The application retrieves the previous day’s ECB reference rate for the selected currency. If the ECB does not publish a reference rate, enter the exchange rate manually in the Exchange rate field.
- Settings: Activate payment reminder and debt collection blocks or change the language and currency of a sales invoice.
- Download offer, Download order confirmation, and Download delivery note: Download the selected document as a PDF file. The seller’s name is printed on the document. The offer, order confirmation and delivery note are not stored in Easor App.
Create a credit note
- In the Invoices view, select the sales invoice for which you want to issue a credit note.
- Open the three-dot menu and select Create a credit note.
- The application selects the same customer for the credit note as for the original sales invoice.
- If necessary, edit the sales invoice information and invoice rows.
- Finally, select Send invoice and the credit note will be sent to the customer in the method you selected.


